Балансировка нагрузки с помощью NginX
Приветствую тебя, дорогой читатель. В этой статье я хочу описать настройку NginX для балансировки нагрузки на несколько back-end серверов, допустим Apache.
Итак предлагается следующая схема (картинка кликабельна):
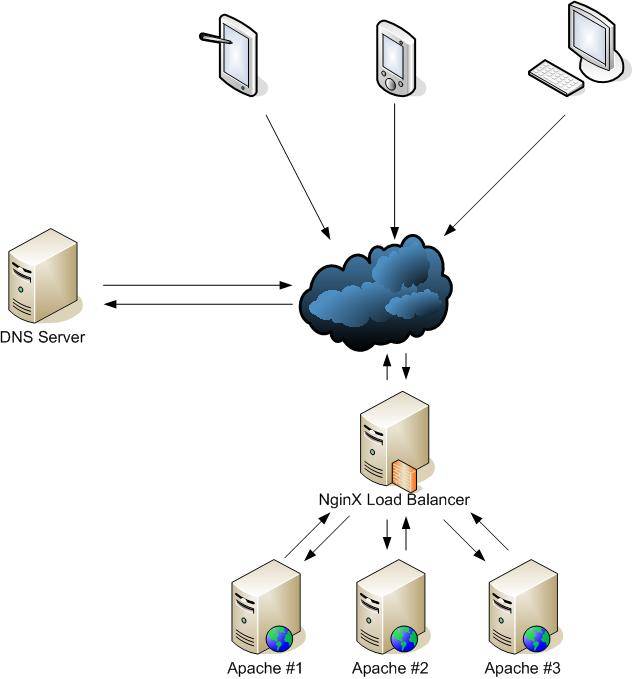
В этом довольно простом деле нам помогут две директивы NginX:
- upstream - директива, которая поставляется с модулем HttpUpstream и позволяет балансировать нагрузку на несколько серверов.
- proxypass - директива, которая поставляется с модулем HttpProxy. Она позволяет корректно отправлять/проксировать запросы на сервера за балансировщиком.
Итак рассмотрим пример. Имеются 3 вэб-головы, на которых крутится один и тот же сайт. :
Apapche#1:
ip: 192.168.10.10
Apapche#2
ip: 192.168.10.20
Apapche#3
ip: 192.168.10.30
В любимом текстовом редакторе создаем конфигурационный файл nginx и вносим в него следующие строки. Лично я люблю, когда настройки сайтов хранятся в отдельных файлах.
upstream http {
	server 192.168.10.10 weight=2 max_fails=2 fail_timeout=2s;
	server 192.168.10.20 weight=2 max_fails=2 fail_timeout=2s;
	server 192.168.10.30 weight=2 max_fails=2 fail_timeout=2s;
}
- weight - определяет значимость сервера в кластере. В данном примере все сервера - одинаковы и могут обслужить одинаковое количество запросов. Если в кластере 1 сервер значительно мощнее остальных - можно указать для него высшее значение этого параметра и NginX будет слать ему больше запросов, чем другим.
- max_fails - определяет количество неудачных попыток соединения с backend сервером.
- fail_timeout - промежуток между неудачными соединениями.
В данном примере после 2-х неудачных соединений на протяжении 4-х секунд, сервер будет помечен как недоступный и запросы к нему не будут отправляться, пока NginX не удостоверится, что с сервером все в порядке.
Методы балансировки нагрузки (описываются в начале секции upstream):
- ip_hash - согласно этому методу запросы от одного и того же клиента будут всегда отправляться на один и тот же backend сервер на основе информации об ip адресе клиента. Не совместим с параметром weight.
- least_conn - запросы будут отправляться на сервер с наименьшим количеством активных соединений.
- round-robin - режим по умолчанию. То есть если вы не задали ни один из вышеупомянутых способов балансировки - запросы будут доставляться по очереди на все сервера в равной степени.
Итак сервера с сайтом описали. Дальше нужно сказать NginX’у что с ними делать. Для этого описываем секцию location с параметрами проксирования запросов:
location / {
	proxy_read_timeout 1200;
	proxy_connect_timeout 1200;
	proxy_pass http://http/;
	proxy_set_header Host $host;
	proxy_set_header X-Real-IP $remote_addr;
	proxy_set_header X-Forwarded-For $proxy_add_x_forwarded_for;
}
Итак полный конфиг для кластера выглядит следующим образом:
upstream http {
	server 192.168.10.10:80 weight=2 max_fails=2 fail_timeout=2s;
	server 192.168.10.20:80 weight=2 max_fails=2 fail_timeout=2s;
	server 192.168.10.30:80 weight=2 max_fails=2 fail_timeout=2s;
}

server {

servername mywebsite.com www.mywebsite.com;
listen 80;

location / {
	proxy_read_timeout 1200;
	proxy_connect_timeout 1200;
	proxy_pass http://http/;
	proxy_set_header Host $host;
	proxy_set_header X-Real-IP $remote_addr;
	proxy_set_header X-Forwarded-For $proxy_add_x_forwarded_for;
}
Большой прелестью балансировки нагрузки с помощью NginX является поддержка SSL Termination. То есть защищенные сессии устанавливаются с самим балансировщиком, и от него же клиенты получают ответ. Есть два варианта настройки:
- По аналогии с предыдущим примером настраиваем балансировку https сессий. При этом ssl хосты должны быть описаны и на Apache серверах. В этом случае https соединения будут устанавливаться с NginX’ом, дальше он будет формировать новый пакет, устанавливать защищенное соединение с Apache серверами, получать такой же защищенный пакет в ответ, распаковывать его, формировать новый и отправлять конечный результат клиенту в защищенном виде. Довольно трудоемкий процесс, согласитесь. В отношении производительности ооочень ресурсо-затратный.
В этом случае наш конфиг будет выглядеть следующим образом:
upstream https {
	server 192.168.10.10:443 weight=2 max_fails=2 fail_timeout=2s;
	server 192.168.10.20:443 weight=2 max_fails=2 fail_timeout=2s;
	server 192.168.10.30:443 weight=2 max_fails=2 fail_timeout=2s;
}

server {
servername mywebsite.com www.mywebsite.com;
listen 443;

ssl on;
ssl_certificate /etc/nginx/SSL/hostname.pem;
ssl_certificate_key /etc/nginx/SSL/server.key;

location / {
	proxy_read_timeout 1200;
	proxy_connect_timeout 1200;
	proxy_pass https://https/;
	proxy_set_header Host $host;
	proxy_set_header X-Real-IP $remote_addr;
	proxy_set_header X-Forwarded-For $proxy_add_x_forwarded_for;
}
- Настраиваем https хост в NginX’e, описываем http (без
S) соединения в upstream списке. Немного лирики: многие CMS системы имеют встроенные проверки наличия безопасных сессий и принудительно переадресовывают клиентов на безопасное соединение на страницах ввода конфиденциальной информации (авторизации пользователей, страницы оплаты услуг). Как правило это производится на основе наличия HTTPS хэдэра со значениемonв переменном окружении SERVER. Можно просто добавлять этот хэдэр в запросы к серверам Apache и не создавать лишней нагрузки. Если этот способ не срабатывает - смотрите пункт 1.
В этом случае наш конфиг будет выглядеть следующим образом:
upstream https {
	server 192.168.10.10:80 weight=2 max_fails=2 fail_timeout=2s;
	server 192.168.10.20:80 weight=2 max_fails=2 fail_timeout=2s;
	server 192.168.10.30:80 weight=2 max_fails=2 fail_timeout=2s;
}

server {
servername mywebsite.com www.mywebsite.com;
listen 443;

ssl on;
ssl_certificate /etc/nginx/SSL/hostname.pem;
ssl_certificate_key /etc/nginx/SSL/server.key;

location / {
	proxy_read_timeout 1200;
	proxy_connect_timeout 1200;
	proxy_pass http://https/;
	proxy_set_header Host $host;
	proxy_set_header X-Real-IP $remote_addr;
	proxy_set_header X-Forwarded-For $proxy_add_x_forwarded_for;
	<strong>proxy_set_header HTTPS on;</strong>
}
Еще больше можно помочь нашим Apache серверами и снять с них ненужную нагрузку, раздавая статические файлы с помощью NginX. Для этого все папки со статическим контентом нужно скопировать (сохраняя дерево каталогов) на сам балансировщик нагрузки (я бы разместил в /var/www/html) и описать раздачу из с помощью NginX прямо перед секцией location / в описании каждого хоста:
location ~* \.(ico|gif|jpeg|jpg|png|eot|ttf|swf|woff)$ {
	root /var/www/html;
	expires 30d;
	access_log off;
}
location ~* \.(css|js)$ {
	root /var/www/html;
	expires 1d;
	access_log off;
}
Для того чтобы статический контент нормально обновлялся при загрузке через web, можно примонтировать соответствующие папки на сервера с помощью NFS.
Как-то так.