Перенос блога между инсталляциями WordPress multisite
В интернете полно статей, которые описывают процедуру переноса блоги из multisite в отдельный WordPress.
В этой статье я опишу, как можно перенести блог/подсайт из одной инсталляции WordPress multisite в другую.
Я предполагаю, что новый мультисайт у Вас уже настроен, поэтому саму настройку рассматривать здесь не буду.
Процесс включает в себя слудующие этапы:
- Перенос библиотеки медиафайлов
- Перенос записей, страниц, черновиков, меню
- Перенос виджетов
- Перенос содержимого библиотек плагинов (NextGen library, Revolution Slider, Photo albums, и т.д.)
- Применение параметров и настроек.
Сам процесс занимает от часа до двух.
Для упрощения текста, я буду рассматривать перенос контента сайта из старого mulstisite-<strong>A</strong> в новый multisite-<strong>B</strong>. При этом multisite-<strong>B</strong> должен иметь установленным тот же набор плагинов, что существуют в mulstisite-<strong>A</strong>
Для дальнейшей работы нам понадобятся так же следующие плагины:
Установите их перед началом работы в обе инсталяции mulstisite-<strong>A</strong> и multisite-<strong>B</strong>.
1. Подготовительный этап:
Перед началом выполнения любых действий обязательно сделайте резервные копии обоих сайтов и их баз данных.
Теперь можно шаманить.
Зайдите в админку multisite-<strong>B</strong> и создайте новый сайт. Включение пользователей и плагинов - опционально.
Дальше нужно определить id сайта в инсталяциях mulstisite-<strong>A</strong> и multisite-<strong>B</strong>.
От значения id сайта зависит месторасположение папки uploads, префикса таблиц в базе, а так же хранилище файлов плагинов. Плагины я рассматривать не буду.
Узнать id быстрее всего можно из адрессной строки брайзера. Открываем страницу редактирования сайта. Обращаем внимаение на адресную строку браузера именно в ней отображается id сайта. Оно нам будет нужно в дальнейшем.
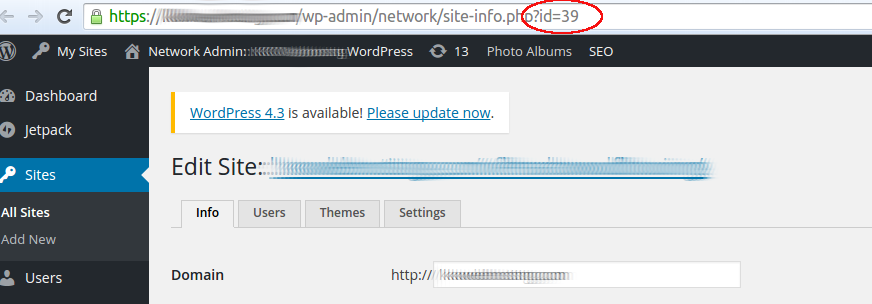
В моем случае id нового сайта multisite-<strong>B</strong> равняется 39. Таким же образом определяем id сайта в mulstisite-<strong>A</strong>. В моем случае - 10.
2. Перенос темы
Самый й простой шаг. Смотрим в настройках сайта включеную тему, берем папку темы из mulstisite-<strong>A</strong> (/wp-contents/themes/имя_темы) и переносим в новый mulstisite-<strong>B</strong>. Убедитесь, что тема не является дочерней.
Для этого откройте файл styles.css и посмотрите нету ли там импорта файла стилей из другой темы:
@import url("../<strong>имя_темы</strong>/style.css")
После этого переходим на страницу настройк сайта в админке mulstisite-<strong>B</strong>. На вкладке темы находим нужноу и включаем ее для нового сайта.
3. Перенос библиотеки медиафайлов
Этот этап немного с подковыркой. Форумы WordPress пестрят записями о проблемах с библиотекой мультимедия после переноса сайта на новый сервер. По факту у людей пусто в админке там, где должен быть списов всех когда-либо загруженных картинок, документов и т.д.
Знатоки предлагают искать спасения в одном из следующих плагинов:
Я их опробывал и удачно поломал всю медиабиблиотеку. Хоршо хоть на своем сайте, а не на сайте кого-то из клиентов. Дело в том, что файлы в папке uploads размещеются в соответсвии с днем загрузки. Так файл загруженый 10-го Сентября 2015 года будет лежать в следующей папке:
/wp-content/uploads/2015/09/10/имя_файла.jpg
Каждый из этих плагинов просканирует предоставленную ему папку и разложит файлы в uploads в соотвествии с датой создания файла. Очень хорошо, если вы не редактировали, не копировали файлы из папки uploads. В противном случае расположение многих файлов может измениться и на страницах ваших сайтов появятся артефакты, символизирующие отсутвие файла в нужном месте. В простонародье - битые ссылки.
Что бы такого не произошло - мы будем зрить в корень, брать быка за рога и тянуть за хвост в длинный ящик.
Для успешного переноса и импорта библиотеки мультимедиа (medialibrary) лучше всего скопировать файлы руками, а сведения о содержимом медиабиблиотеки скопировать mysql запросом.
Краткая справка:
WordPress хранит очень много информации в таблице wp_posts. Из названия можно понять, что там хранятся записи. Можно предположить, что там же стоит искать и страницы сайта.
Возможно для Вас будет сюрпризом, но там же хранится информацию о загруженных файлах.
В папке сайта mulstisite-<strong>A</strong> нужно перейти в каталог загрузок интересующего нас подсайта. Точное местонахождение может отличаться в зависимости от настроек сайта, но найти его несложно, поскольку он содержит id сайта в названии. В моем случае это был:
/wp-content/uploads/sites/10
Придерживайтесь того же самого принципа при поиске папки uploads в mulstisite-<strong>B</strong>. В моем случае это был:
/wp-content/uploads/sites/39
Скопируйте все файлы и папки из одного сайта в другой.
После этого можете заглянуть в админку нового сайта и удостовериться, что библиотека медиафайлов пуста.
Теперь дело за mysql. Я предполагаю, что вы знаете префикс таблиц базы Ваших сайтов. По умолчанию это wp_. В случае с мультисайтом следом за системным префиксом таблиц идет id сайта, который мы знаем. В моем случае все таблицы в базе, связанные с исходным сайтом имели префикс wp_39_. Все таблицы нового сайта имели префикс wp_10_.
Хорошо, если базы сайтов находятся на одном сервере. Если же это не так - сделайте дамп таблицы posts на исходном сервере и разверните его в пустую базу на новом сервере. Дамп/слепок таблицы можно сделать так:
mysqldump -u’root’ -p имя_базы wp_39_posts > имя_базы-wp_39_posts.sql
После того, как обе теплицы будут в соседних базах, подключитесь к консоли mysql от имени пользователя, который имеет права работать с обоими базами и выполните следующие запросы:
insert ignore into имя_базы.wp_39_posts SELECT * FROM имя_старой/временной_базы.wp_10_posts where post_type = ‘attachment’;
insert ignore into имя_базы.wp_39_postmeta SELECT * FROM имя_старой/временной_базы.wp_10_postmeta where meta_key = ‘_wp_attached_file’;
insert ignore into имя_базы.wp_39_postmeta SELECT * FROM имя_старой/временной_базы.wp_10_postmeta where meta_key = ‘_wp_attachment_metadata’;
Естественно замените имена баз и префиксы на свои значения.
После этого можно заглянуть в библиотеку медиафайлов, что бы проверить результат.
На этом с медиафайлами закончили.
4. Перенос записей, страниц, черновиков, меню
Вот казалось бы: Почему бы не перенести всё из таблицы posts в новую базу и не морочить голову?. При таком подходе я потерял менюшки и категории статей, но они прекрасно переносятся стандартным инструментом импорта/экспорта в WordPress. Находится он в админке в меню Инструменты/Tools.
Убедитесь, что Вы находитесь в админках именно того подсайта, с которым работаете. Не вздумайте экспортировать всё из исходного сайта и импортировать эти данные в корень мультисайта B.
Экспортируем все из сайта в mulstisite-<strong>А</strong> и импортируем в новый сайт (mulstisite-<strong>B</strong>).
Проставлять следующую галку не нужно. Папку загрузок мы уже скопировали:

Ждем завершения импорта, которое должно ознаменоваться следующим сообщением:
All done. Have fun!
Все сообщение в следующем стиле можно игнорировать:
Failed to import Media
После этого все Ваши записи и страницы будут доступны в соответствующих разделах админки подсайта.
Странная штука этот инструмент экспорта/импорта. Он теряет все элементы iframe. Хорошо, если их нету на страницах Вашего сайта. Если же есть - проверьте все страницы внимательно. Для этого я открывал xml файл импорта в текстовом редакторе и искал слово iframe. Каждый элемент этого файла содержит id записи и тип. Стоит обращать внимание на записи типа post и page. Все черновики (draft) и ревизии (revision) можно игнорировать.
Как Вы понимаете, в связи со меной ID сайта все картинки и прочие файлы имеют нерабочие ссылки. Для того, что бы все починить воспользуемся плагином Velvet Blues Update URLs. Он поможет поменять старые URL’ы на новые.
Нахидм его в Инструментах/Tools:
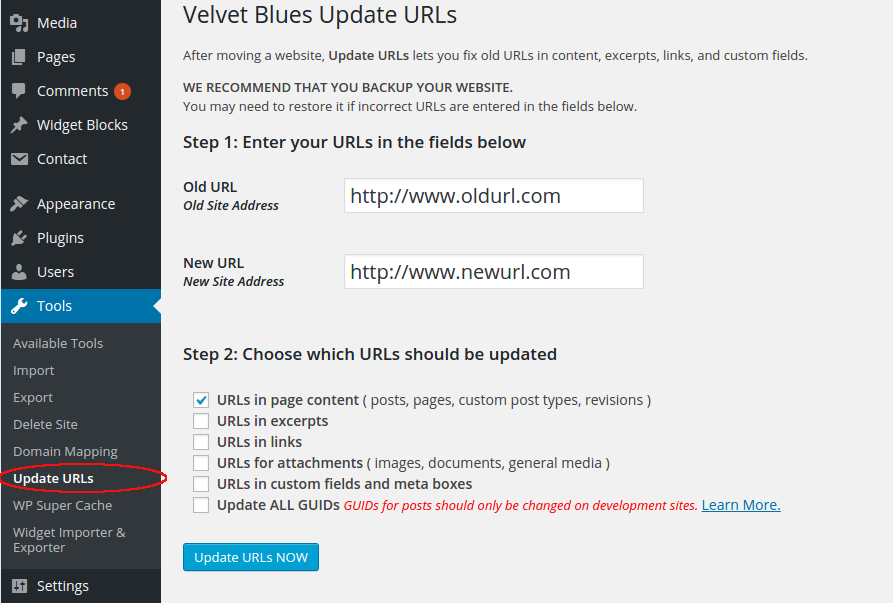
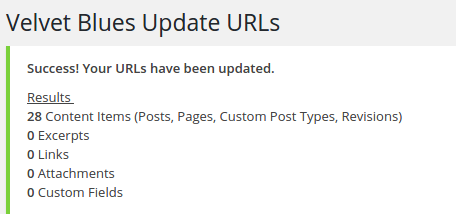
Думаю не нужно объяснять что куда вводить. В результате выполнения оно скажет:
5. Перенос виджетов
Для переноса виджетов воспользуемся плагином Widget Importer & Exporter. Он находится в списке инструментов в админке. Ниже стандартного экспортера:
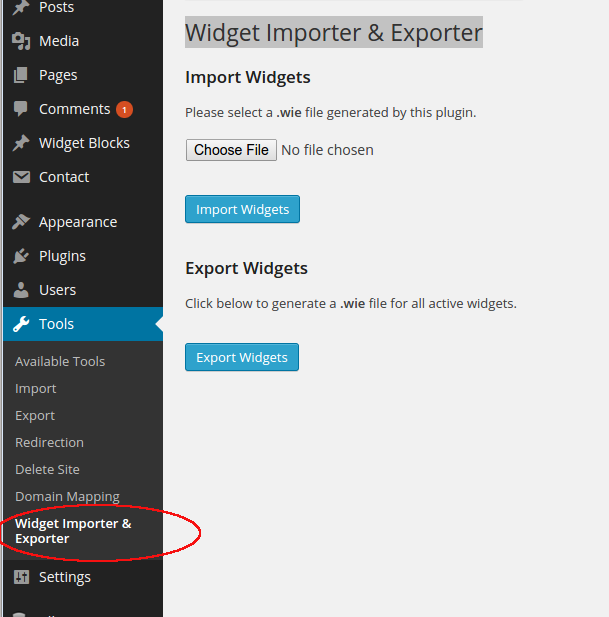
Экспортируем виджеты из исходного сайта. Он предложит сохранить файл с расширением wie. Соглашаемся.
Ваши виджеты опять же могут содержать картинки со старыми ссылками. К сожалению ‘Velvet Blues’ не может их обработать. Я пробовал реками обновить ссылки в базе данных, но в результате потерял все виджеты. В причине я разбираться не стал, а просто вернул все как было.
Для того, что бы Ваши виджеты содержали корректные ссылки, лучше перед импортом отредактировать сохраненный wie файл в любом текстовом редакторе и заменить ссылки на старые страницы сайта новыми (при необходимости).
В файле все специальные ссылки будут забэкслэшэны, то есть будут иметь перед собой символ \ (back-slash). Back-Slash также является специальным, поэтому есть вариант, что вам понадобится продублировать каждый символ \ в поле поиска и замены. Опять же зависит от редактора и режима поиска-замены.
Дальше в новом сайте нужно включить все плагины, в соответствии со старым. Удостоверьтесь, что в админке самого подсайта все нужные плагины включены.
Как только все изменения сделаны, можете смело импортировать wie файл в новый подсайт.
6. Перенос содержимого библиотек плагинов (NextGen library, Revolution Slider, Photo albums, и т.д.)
К сожалению в рамках этой статьи я не могу рассмотреть варианты переноса данных для всех плагинов. Могу лишь подсказать, что в большинстве плагинов есть инструменты импорта и экспорта.
Отпишите в комментариях, с какими проблемами Вы столкнулись и я рассмотрю и подскажу как с этим бороться (по мере возможности)
7. Применение параметров и настроек.
Завершающим этапом является применение параметров сайта.
В разделе Внешний вид включаем меню в соответствии с текущими настройками исходного сайта. Все пункты должны быть на месте, просто меню неактивны.
Также сверяем Настройки:
- Общие (General)
- Чтение (Reading)
- Постоянные ссылки (Permalinks)
Эпилог
В завершение хочу сказать, что в рамках одной статьи невозможно рассмотреть все подводные камни переезда блогов между мультисайтами. Статья написана на основе вполне конкретного опыта, с вполне конкретным клиентом. В ходе работы я столкнулся с проблемами в работе нескольких плагинов. Проблемы были связаны со сменой концепции ссылок.
Если вы столкнулись с какой-либо проблемой в ходе работы - оставьте комментарий с детальным описанием проблемы и я ее рассмотрю.