Как установить Java JRE на Linux Ubuntu
Дальше речь пойдет о том, как установить самую последнюю версию Java JRE на Linux Ubuntu.
Для начала переходим по следующей ссылке:
http://www.oracle.com/technetwork/java/javase/downloads/index.html
принимаем условия лицензионного соглашения и скачиваем архив с Java JRE:
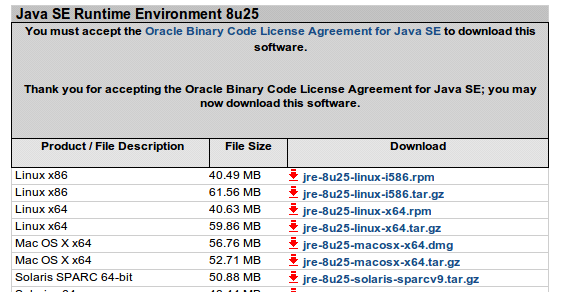
Создадим папку для Java и распакуем в нее содержимое архива:
sudo mkdir -p /usr/local/java
У меня архив сохранился в папку Downloads. Куда бы он не сохранился у Вас - переместите его в папку /usr/local/java:
sudo mv ~/Downloads/jre-8u25-linux-x64.tar.gz /usr/local/java
sudo cd /usr/local/java
sudo tar xf jre-8u25-linux-x64.tar.gz
Отредактируйте файл /etc/profile следующими строками:
JAVA_HOME=/usr/local/java/jre1.8.0_25
PATH=$PATH:$HOME/bin:$JAVA_HOME/bin
export JAVA_HOME
export PATH
Дальше выполните в консоли следующую последовательность команд. Обратите внимание на, выделенною жирным, имя папки jre1.8.0_25. В вашем случае оно может отличаться, и чем больше времени прошло с момента публикации, тем сильнее будет отличаться версия Java и имя папки, соответственно:
sudo update-alternatives -install `/usr/bin/java` `java` `/usr/local/java/**jre1.8.0_25**/bin/java` 1
sudo update-alternatives -install `/usr/bin/javaws` `javaws` `/usr/local/java/**jre1.8.0_25**/bin/javaws` 1
sudo update-alternatives -set java /usr/local/java/**jre1.8.0_25**/bin/java
sudo update-alternatives -set java /usr/local/java/**jre1.8.0_25**/bin/javaws
sudo update-alternatives -set javaws /usr/local/java/**jre1.8.0_25**/bin/javaws
Теперь применяем содержимое файла profile в рамках активной сессии (после перезагрузки они сами вступают в силу):
source /etc/profile
Теперь в результате выполнения следующей команды:
java -version
Вы получите следующий вывод:
